A DIY fairy light lantern is a fun and pretty thing you can make. It mixes dream things with light. Usually made with jars or lanterns, these magical things are decorated like fairies. They have bright colors and often use tea lights that glow from magic LED light. The drawings can have images of fairies, shiny glitter and other things that create a feeling of magic and cuteness.
Fairy lanterns are fun to make and also look special on home decor. The soft glow from the LED lights makes fairy lanterns a liked choice for people who enjoy crafting and those looking to make their homes more magical.
Welcome to the magical world of making things yourself! In this easy guide, we will start a fun adventure to make fancy light things for fairies that will brighten your place with magic.
Get your things ready, and let’s add magic to our crafting fun to make our fairy lamp.
Materials You’ll Need: Mason Jars or Glass Lanterns LED Tea Lights Acrylic Paints Paintbrushes Glitter Glue Fine Glitter Decorative Craft Paper Mod Podge or Clear Glue Twine or Ribbon Artificial Flowers and Leaves Craft Glue Scissors
Image credit: Needpix.com
visit online to explore fairy images to get your creative juices flowing
Step 1 to 5
Step 1: Prep Your Work Area Put down newspaper or a craft mat on your work area to keep it neat. Make sure all your stuff is close by.
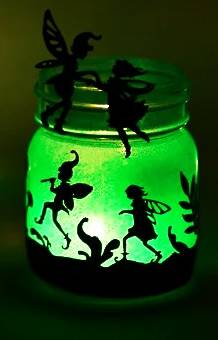
Step 2: Paint the Base Choose your favorite colors and paint the outside of jar made from mason or glass lantern. Wait until it is fully dry before putting on another layer for a bright look.
Step 3: Add Glitter Magic After the paint has dried, put glittery stick on it in shapes or curls. Add small sparkly stuff on top of the glue to make it shine bright. Let it dry thoroughly.
Step 4: Create Fairy Silhouettes Cut out fairy shapes from pretty craft paper. These can be fairies in different positions, with wings or magic things like stars and moons.
Step 5: Mod Podge Magic Using Mod Podge or clear glue, stick the fairy pictures onto the outside of the jar. Get rid of any air bubbles or creases. Put more Mod Podge on the cutouts to make them shiny.
Master Tip :
Download free Silhouette for your DIY Fairy Light Lantern on Freepik
Step 6: Bring in the Blooms With craft glue, stick fake flowers and leaves to the top edge of the jar. This makes your fairy light even more magical.
Step 7: Tie it Up Put string or ribbon around the jar’s neck and make a bow by tying it. This not only makes things look pretty but also gives a lovely countryside feel.
Step 8: Illuminate the Magic Put an LED tea light in the jar. The bright light will make your fairy lamp shine, giving a gentle radiance to the decorated and shiny things around it.
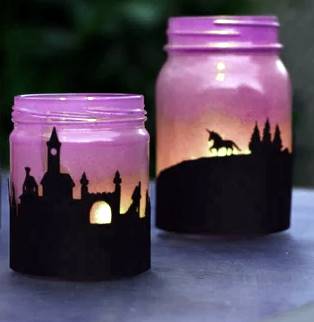
Step 9: Create a Fairyland Display Make several fairy light lantern in different colours and with silhouettes of fairies. Put them together to make a fun show that takes you into a magical land of fairies.
Step 10: Share the Magic Put your fairy lights in your house, on a porch or at special parties. These special things also make great presents for friends and family.
Congratulations!
You’ve just made your own fun DIY fairy light lantern, making a bit of magic in the place around you. Have fun making this lovely do-it-yourself craft.